When WordPress is installed, it has a number of items that are set up generically. In this lesson I’ll go through some of the items you should take care of. Basic Housekeeping, as it were.
When your WordPress was installed you may or may not (depends on your webhost) have been prompted to supply a user name and password. WP will automatically give you a username of “admin” and a complex password if you are not asked to supply them. You should enter your own easy to remember username and password if requested.
Log onto your WordPress. The basic entry into the WP Dashboard will be wp-login.php i.e. www.xyz.com/wp-login.php

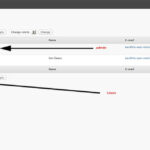
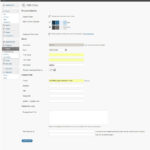
On the left side of your WordPress Dashboard, click on the Users button. You will see a drop-down list and the Authors & Users will automatically be shown. On this page, at the top, click on admin, this will take you to the Edit User page to edit your information for the user, admin.. Fill in the information requested. The admin account cannot be deleted. At the bottom of the page you’ll see a place to change the WordPress login password.

You can now change the admin password that WordPress assigned to you when it was set up. Change it to something that you can remember easily… but remember to make it a strong password for security reasons!
After you have made the changes to this page, be sure to click on the Save Changes button at the bottom of the page.
You may have seen another user listed when you clicked the Users button. You may want to Add a User. Just click the appropriate button and go through the same procedure as you did with the admin account. The only additional thing to look for is on the Edit User page look for the Roll setting. At this point you will likely want to grant administrator rights. The other settings are relevant if other people will be granted various, lesser, privileges. I’ll cover this in a later lesson.

Now, look over on the left of your WP-Dashboard (WP ver. 2.7 or greater), look for the Settings tab and click it.
You will see a drop-down menu with a number of items (the items will vary – plugins may add their controls here). Select General.

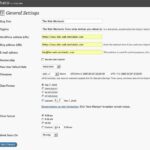
At the top of the General page you will see a few places where you can enter the Name of your blog and the Tagline for your blog. These are important to fill in as they will help the search engines know your blog exists! The next two spaces are for the URL of your website and blog, respectively. They will probably already be filled in correctly. Follow the onscreen instructions to change them, if necessary. Finally, be sure to enter your e-mail address! There are a few other items on this page, but it is unlikely that you’ll need to change them from their defaults.
After you have made the changes to this page, be sure to click on the Save Changes button at the bottom of the page.
Superb Blog here.. I been using Akisment for my wordpress blog and wondering if it does a good work of protecting spam as many pass through? A reply would be helpful mate.
Hi Lily,
From what I have seen, Akismet does a reasonable job. However, many seem to think that the Typepad plugin for WordPress does a much better one. I’m using Typepad myself and it seems to work quite well! Like Akismet, you’ll need to get an API key.
It is rare that a spam comment makes it through the filter. It does quarantine the spam it filters so that you can inspect it and I have yet to see it tag a “good” message as spam. You can also have it automatically delete the quarantined messages after a set length of time, so that pile of quarantined messages doesn’t get too large.